You will need:
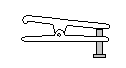
Changing the springs can be a dangerous job. The free length of the springs is huge, and so when they are compressed enough to fit and remove they have a lot of stored energy. If one should suddenly be released, it will fly around, damaging you, the car, or anything else in the way. If one of the spring compressors should come off, it will be flung about with a lot of force. Before using the spring compressors, check that the hooks are complete and undamaged. They should latch firmly on the spring coils, but any chipping to the hooks could reduce the safety margin. Also, there is usually a pin in one end of the threaded bar which is to prevent one of the hooks coming off. You will need to knock out this pin, as there is not enough room for the bar to be turned with it in. Do not try to separate the main swivel ball joints with a forked chisel type separator. a) it wont work, and b) you will damage the ball joint rubbers, a sure MOT fail next year! The lever separator I used is made by Sykes-Pickevant.
1. Jack up the front of the car, and support it on axle stands under the front end of the chassis rails.
2. The job will be a whole lot easier if you remove the hub carrier, so:
3. Remove the brake caliper by bending back the locking tabs on the fixing bolts, and undoing them. This is where the 19mm 6-sided socket and the breaker bar will be useful. These bolts are often seized, and need more than the usual effort to shift. Tie the caliper to the body so as to ensure that the brake pipe and the pad warning cable are not under stress.
4. Undo the two 22mm nuts securing the top and bottom ball joints, and separate them. If the separator is inclined to fall off, put a nut back on the stud, screwed on just enough to make a wider top to the stud.
5. Separate the track-rod end ball joint.
6. Slacken off the 19mm pivot bolt securing the lower arm to the subframe. This will allow the arm to swing more freely, and reduce the chance of damaging the bush.
7. Tie the upper arm up as far as possible. If it is still in the way, remove the rubber bump stop. If the arm wont move that far, remove the split pin securing the nut on the upper arm pivot bolt, and slacken this off.
8. Undo and remove the two bolts securing the tie bar and anti-roll bar bracket to the lower arm
9. Lift the end of the lower arm with a jack, and remove the shock absorber. Caution: There is nothing keeping the lower arm up except the jack when the shock absorber is removed!
10. Put the chain up the middle of the spring, and pass the shock absorber bolt through the top link. Either put a long bolt through the bottom link, or tie the end to something solid. This is your safety net.
11. Lower the arm by about an inch or so, and put the spring compressors on the spring, one each side, hex drive ends down. There must be three free loops between the hooks. Do not try to tighten up the spring compressors if they are not both like this. If you have difficulty putting the compressor hooks between the spring coils, lower the arm enough to open the spring coils. Tie the two compressors together with a piece of rope, so that if one flies off, it wont hit anything. Tighten the two compressors until the distance between the hooks is about half as much.
12. Lower the arm slowly. As the angle on the jack becomes poor, place the second jack under the arm, and take the weight, while you re-seat the first jack. If you are using a trolley jack, ensure that it rolls forward correctly as the arm pivots.
13. When the arm is lowered as far as possible, the spring should now be free. If it is not, jack up the arm again, and tighten the compressors some more. When the spring is loose, drop the safety chain and carefully lift out the spring.
 |
|
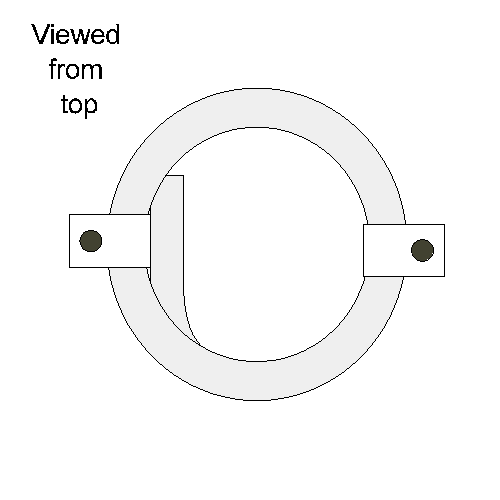
Fig 2 |
14. It is not possible to simply remove the compressors from the spring, theyre not long enough! First measure the length of the spring, in its compressed state. Write this value down as the assembly length. Then loosen the compressors until they are at the end of their motion. (you may prefer to put the safety chain though the spring at this point, attached at each end to something heavy). Now, either with the spring squasher, or with a second set of compressors, take the pressure off the first set. Then you can release the second set, or undo your spring squasher.
15. When fitting the new springs, (or refitting the ones youve got, if youre salvaging a set), you will first have to compress them to the right length to fit. With a free spring, standard spring compressors cannot reach enough loops to compress the spring enough, so using the second set, or the spring squasher, compress the new spring until you can put the compressors on so as to have 3 free loops, as before. Place these compressors as in the diagram (fig 2). Tighten the compressors until the length of the spring is the assembly length.
16. Fit the spring on the lower arm, and engage it with the flange on the subframe. Make sure that the straight part at the bottom of the spring is lined up with the shaped part of the lower arm.
17. Insert the safety chain, and jack up the lower arm. If you are using screw jacks, you will need to pause several times to support the arm with one jack, while you re-seat the other. Make sure that you end up with the shock absorber hole in the lower arm free.
18. When the arm is up enough, slacken and remove the compressors.
19. Remove the chain, and refit the shock absorber.
20. Panic over! Now reassemble the other parts that were removed. Clean the studs on the ball joints before refitting the hub carrier. (It also helps to connect the track rod end before tightening the main ball joint studs, as it gives you something to tighten against). Do not tighten the upper and lower arm pivot bolts until the car is resting on its wheels. This makes sure that the rubber bushes are in the correct position at the normal ride height. Dont forget to refit the bump stops if you removed them!